
Expert articles, clinical developments, and innovation trends in orthopedic implants and trauma fixation.
In-depth coverage on biocompatible materials, implant engineering, and modern surgical techniques.
Choosing Cancellous Screws in 2026 requires more than comparing product catalogs or selecting the largest available diameter. Surgeons must assess bone quality, fracture pattern, thread design, screw length, head profile, and the expected mechanical load. A screw placed in soft metaphyseal bone behaves differently from one placed near a dense cortical zone. Small details matter. Thread purchase can determine stability.
Orthopedic trauma expert Dr. Stephan Perren emphasized a principle widely used in fracture care: “The implant must be adapted to the biological and mechanical conditions of the fracture.” That idea remains highly relevant when selecting Cancellous Screws for the femur, tibia, ankle, wrist, or pelvic region. Current decisions should also consider imaging quality, patient age, osteoporosis risk, surgical access, and implant compatibility. A longer screw is not always better. A wider screw may improve purchase, but it can also compromise surrounding bone or limit placement options.
In clinical practice, experienced teams often compare radiographs with three-dimensional imaging before final selection. They check whether the threads will cross the intended fragment and whether the screw can achieve compression without damaging the joint surface. This step is easy to underestimate. I have also found that catalog specifications cannot replace direct surgical judgment. Manufacturing quality, validated testing, traceability, and regulatory documentation deserve equal attention. No single screw suits every fracture. The best choice is the one that matches anatomy, biology, loading conditions, and the surgeon’s verified technique. Mistakes remain possible, so careful reassessment should be part of the plan.
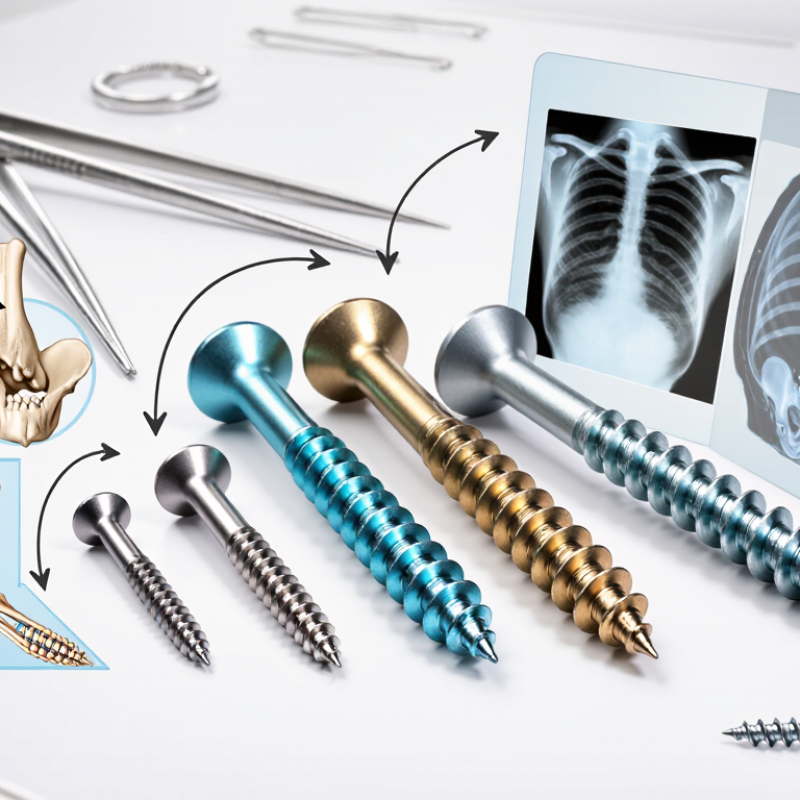
Cancellous screws are designed for softer, porous bone, especially in metaphyseal regions. Their wider threads can achieve purchase where cortical screws may not perform well. Clinical applications include fracture fixation near joints, osteoporotic bone, epiphyseal fragments, and some small-bone procedures. The choice depends on anatomy, fracture pattern, and bone quality.
Length matters.
The screw should cross the intended fragment without unnecessarily entering the joint. A partially threaded screw may provide interfragmentary compression when its threads remain beyond the fracture line. Fully threaded designs can offer positional fixation when compression is not appropriate. Diameter should match the fragment and available bone stock, not simply the surgeon’s usual preference. Measure carefully.
Bone quality changes the decision. In fragile bone, a washer may reduce surface pressure and prevent the head from sinking. However, extra hardware can irritate soft tissue or complicate later treatment. Imaging should confirm trajectory and joint clearance. Surgical technique remains critical: accurate drilling, gentle insertion, and avoiding excessive torque reduce avoidable damage.
Small details matter most.
Clinical teams should also consider the patient’s age, activity level, healing potential, and expected loading. Evidence and local protocols deserve attention, but neither replaces case-specific judgment. I would not treat a sizing chart as a final answer. Real anatomy is less cooperative than diagrams, and that limitation should remain part of the plan.
Bone quality should guide screw selection, not habit. The CDC reported osteoporosis in 12.6% of U.S. adults aged 50 and older during 2017–2018. Another 43.1% had low bone mass. These figures make purchase depth and thread engagement clinically important. In soft metaphyseal bone, a larger thread diameter may improve grip. Excessive tightening can still strip the purchase. That risk is easy to underestimate.
The CDC reported osteoporosis in 12.6% of U.S. adults aged 50 and older during 2017–2018.
Read the fracture pattern carefully. A simple transverse fracture may benefit from controlled interfragmentary compression. A shear fracture needs stronger buttress support. Comminution changes the plan again. It may require neutralization rather than compression. For articular fractures, screw length should support the fragment without entering the joint. Confirm this with multiple fluoroscopic views. One view is not enough.
Fixation goals should define the screw configuration. Use partially threaded screws when compression is intended across a fracture line. Use fully threaded options when maintaining position matters more than compression. Washers can help distribute load in fragile cortical surfaces, but they are not a substitute for adequate bone stock. The International Osteoporosis Foundation estimates that one in three women and one in five men over 50 will experience an osteoporotic fracture. Patient age, local bone density, and expected loading deserve equal attention. I would also question routine sizing formulas. Anatomy varies, and imaging can mislead. A millimeter of extra length may create avoidable joint penetration.
Choosing cancellous screws in 2026 requires more than matching a catalog measurement. Screw diameter should suit bone quality, fracture pattern, and the available purchase area. A larger diameter may improve strength, but it can also remove more bone and increase insertion resistance. Length matters just as much. The screw should cross the fracture zone and obtain reliable thread engagement without unnecessary protrusion. Measure carefully on imaging, then confirm the depth during surgery.
Thread design deserves close attention. Coarse threads can achieve strong purchase in softer metaphyseal bone, while finer threads may offer more controlled advancement. Fully threaded screws can maintain compression differently from partially threaded designs. The choice depends on whether interfragmentary compression is required. Small details matter. Do not assume one pattern suits every fracture. Material also affects performance. Stainless steel and titanium alloys provide different balances of strength, stiffness, imaging compatibility, and handling characteristics. Review verified mechanical data and current surgical guidance rather than relying on habit.
Tips: Compare diameter and length with the patient’s radiographs, not intuition. Check thread pitch, core diameter, and head design together. Consider bone density, soft-tissue coverage, and removal plans. In my experience, rushed measurements create avoidable problems. I have also seen “ideal” lengths change after reduction. Recheck the measurement. When evidence is limited, document the reasoning and discuss the choice with the treating orthopedic team. Surgical judgment remains essential.
How to Choose Cancellous Screws in 2026?
Choosing a cancellous screw begins with the fracture, bone quality, and fixation goal. Soft metaphyseal bone may require deeper threads and a suitable thread-to-shank design. Measure the available bone carefully. Fit matters. Confirm screw diameter, length, thread profile, head shape, and material with the surgical plan. A longer screw is not automatically better. Excessive length can irritate soft tissue or compromise nearby structures.
Compatibility must be checked before the procedure, not during it. Match the screw recess with the correct driver bit, and confirm guide wires, drill sleeves, taps, countersinks, and depth gauges. Instrument tolerances can vary between systems. Do not guess. Review current editions of applicable standards, such as ISO 5835 or ASTM F543, and verify regional regulatory requirements. Also check imaging compatibility, sterilization instructions, packaging integrity, and approved surgical use. A small mismatch may waste valuable operating time.
Tips: Create a component checklist for every screw size. Confirm the driver engages fully without wobbling. Keep backup instruments available. Ask the surgical team to verify measurements independently. In my view, catalog descriptions are useful but incomplete; the actual tray, bone condition, and operative technique still matter. This is where selection becomes less tidy than a spreadsheet. Measure twice. Document the final choice and any reason for deviation.
Check compatibility, standards, and surgical instrument requirements
The chart shows commonly encountered nominal cancellous screw diameters in orthopedic fixation: 4.0 mm, 6.5 mm, and 7.3 mm. Actual dimensions, thread geometry, head design, and drive interfaces vary by screw system. Before surgery, confirm the screw diameter and length, thread profile, guide-wire or drill compatibility, driver interface, insertion instruments, and applicable requirements such as ISO 5835 or ASTM F543. Standards support dimensional and performance verification but do not guarantee interchangeability between systems.
Choosing a cancellous screw in 2026 should begin with the fracture, not the catalog. CT images can reveal comminution, bone density changes, and the safest purchase zone. Plain radiographs still help assess alignment and screw length. The selected diameter, thread pattern, and length should match the patient’s anatomy and fixation goal. A larger screw is not automatically stronger.
Planning must be measurable. Use calibrated images or digital templating to estimate the entry point, trajectory, and depth. Mark nearby cartilage, vessels, nerves, and tendons before surgery. A few millimeters can separate stable fixation from joint penetration. Consider osteoporosis, fracture displacement, swelling, and the patient’s ability to follow weight-bearing instructions. Review current clinical guidance and the device’s approved instructions with the responsible orthopedic team.
Risk assessment should challenge the preferred option. What happens if the screw strips weak bone? Is another trajectory available? Can imaging confirm the tip position during the procedure? Keep suitable alternatives ready, but do not select them casually. A plan can still be wrong. Bone quality may look better on imaging than it proves in the operating room. Recheck measurements after reduction, and document why the final length and placement were chosen. Peer review can expose a blind spot before incision. Patient-specific consent should include possible revision, loss of fixation, infection, neurovascular injury, and joint damage.
| Decision Dimension | Planning Data or Common Options | When It May Be Appropriate | Primary Risk | Final-Choice Validation |
|---|---|---|---|---|
| Screw diameter | Common cancellous screw nominal diameters include approximately 4.0 mm, 4.5 mm, 6.5 mm, and 7.3 mm, depending on the system and anatomy. | Select a diameter that provides adequate thread purchase while respecting the available bone corridor and the surrounding joint or neurovascular structures. | Oversizing can weaken or split the bone, especially near the cortex; undersizing may reduce pull-out resistance. | Measure the planned corridor on appropriately calibrated radiographs or CT and confirm that the drill and screw dimensions match the selected system. |
| Length | Length is typically chosen from the measured entry point to the intended endpoint, with the exact available sizes determined by the screw system. | The threaded portion should achieve sufficient cancellous purchase; the tip should not unintentionally penetrate a joint, physis, or opposite cortex. | A screw that is too short may provide inadequate fixation; excessive length may cause joint penetration, soft-tissue irritation, or neurovascular injury. | Use two-plane imaging or three-dimensional CT when anatomy is complex, and verify the measurement intraoperatively before final insertion. |
| Thread configuration | Partially threaded screws provide a smooth-shank segment and a threaded segment; fully threaded screws engage bone along most or all of the shaft. | A partially threaded design may support interfragmentary compression when the near fragment is gliding; a fully threaded design may be considered when compression is not the primary objective or when position control is needed. | Incorrect thread placement can prevent compression, displace the fracture, or create loss of fixation during tightening. | Confirm that the thread length crosses the intended fragment interface and that the near fragment can glide when compression is required. |
| Thread pitch and profile | Cancellous screws generally use a coarser thread than cortical screws to engage trabecular bone; pitch and thread depth vary by design. | Coarse, deep threads can improve purchase in cancellous bone when the surrounding trabecular structure is adequate. | Poor bone quality, over-tightening, or repeated insertion may strip the trabecular purchase. | Assess bone quality from CT, radiographs, patient history, and intraoperative resistance; avoid relying on thread geometry alone. |
| Head and washer selection | Options may include a conventional head, a low-profile head, or a washer used to distribute load over the cortical surface. | A washer can be useful in thin or fragile cortical bone or when the screw head could otherwise sink into the surface. | Prominent hardware may irritate soft tissue; a washer that is too large may interfere with adjacent structures. | Check the soft-tissue envelope, countersink requirements, washer diameter, and compatibility with the selected screw system. |
| Fixation objective | Define whether the goal is interfragmentary compression, positional fixation, subchondral support, or temporary stabilization. | The objective determines screw trajectory, thread position, number of screws, and whether supplemental fixation is required. | A screw selected without a clearly defined mechanical objective may fail to control shear, rotation, or collapse. | Document the intended load path and confirm that the planned construct addresses the dominant force: compression, shear, bending, or torsion. |
| Bone quality | Consider trabecular density, cortical thickness, osteoporosis, metabolic bone disease, age, smoking status, and medication history. | Reduced bone quality may require a longer purchase zone, a larger load-distribution area, multiple fixation points, or an alternative construct. | Low bone density increases the risk of thread stripping, migration, loss of reduction, and delayed union. | Combine imaging findings with clinical risk assessment; do not infer bone strength from patient age alone. |
| Trajectory and safe corridor | Plan the entry point, screw axis, depth, and distance from articular cartilage, growth plates, major vessels, nerves, and tendons. | A central or biomechanically favorable trajectory is preferred when it maximizes purchase and avoids critical structures. | Malposition may cause joint penetration, neurovascular damage, tendon irritation, or inadequate fragment control. | Use orthogonal fluoroscopic views and, where indicated, CT-based planning or navigation to confirm the corridor. |
| Number and configuration | One screw may be sufficient for selected small, stable fragments; multiple screws or a supplemental plate may be needed for larger, unstable, or rotationally sensitive constructs. | Use the smallest construct that provides reliable compression, rotational control, and resistance to expected loading. | Too few fixation points can permit rotation or collapse; excessive hardware can increase surgical trauma and conflict. | Review screw spacing, parallelism, purchase length, and construct stability under expected functional loads. |
| Drilling, tapping, and insertion | Follow the selected system’s recommended guide, drill, tap, depth-gauge, and torque sequence; technique varies with screw design and bone quality. | Controlled preparation helps maintain the planned trajectory and reduces insertion resistance and thermal or mechanical damage. | Incorrect instrumentation or excessive torque can strip bone, damage the screw, or alter reduction. | Confirm instrument–screw compatibility, measure depth after preparation, and stop if resistance or trajectory differs from the plan. |
| Material and imaging considerations | Common implant materials include stainless steel and titanium alloys; radiographic visibility and MRI conditions depend on the specific implant system. | Material selection should account for mechanical requirements, allergy history, corrosion compatibility, and future imaging needs. | Unverified MRI conditions, metal incompatibility, or imaging artifact may create avoidable safety and follow-up problems. | Verify the exact material, MRI labeling, sterilization status, and compatibility with any other implanted components. |
| Risk–benefit checkpoint | Balance stability against risks such as joint penetration, fixation failure, infection, soft-tissue irritation, delayed union, and reoperation. | Proceed only when the expected mechanical and biological benefit outweighs the patient-specific procedural risk. | A technically feasible screw may still be inappropriate if the patient’s healing capacity or surgical risk is unfavorable. | Record the chosen diameter, length, thread configuration, trajectory, imaging confirmation, and contingency plan before final implantation. |
Planning values are general clinical reference points rather than a substitute for the selected implant system’s instructions for use, patient-specific imaging, or qualified surgical judgment.
They are designed for softer, porous bone, especially near joint regions. Their wider threads improve purchase in weaker bone. Anatomy still decides.
Possible uses include fractures near joints, fragile bone, small bone fragments, and some metaphyseal injuries. The fracture pattern matters.
The screw should cross the intended fragment and fracture zone. It should avoid unnecessary joint entry or excessive protrusion. Measure twice.
Partially threaded screws may create interfragmentary compression when threads remain beyond the fracture line. Fully threaded screws may provide positional fixation.
Fragile bone may benefit from a washer, which spreads pressure beneath the screw head. However, it can irritate nearby soft tissue.
Not always. A larger diameter may improve strength, but it can remove more bone and increase insertion resistance. Bigger is not automatically better.
Stainless steel and titanium alloys differ in strength, stiffness, imaging behavior, and handling. Review verified mechanical information before choosing.
Confirm the driver bit, guide wires, drill sleeves, taps, countersinks, and depth gauges. The driver should engage fully without wobbling. Do not guess.
Teams should review current applicable standards, regional requirements, imaging compatibility, sterilization instructions, and package integrity. Requirements may change.
Real anatomy may differ from diagrams, especially after reduction. Recheck imaging, confirm depth, document unusual decisions, and involve the treating orthopedic team. Charts help, but they are not the final answer.
Choosing the right Cancellous Screws in 2026 requires a structured evaluation of both clinical needs and surgical conditions. Begin by understanding how these screws are used in cancellous bone, including fracture fixation, osteoporotic bone management, and procedures requiring stable compression. Assess bone quality, fracture pattern, fragment size, and the intended fixation goal before selecting a screw. These factors help determine whether the construct should prioritize compression, resistance to pull-out, controlled stability, or ease of removal.
The final selection should compare screw diameter, length, thread design, and material while ensuring that the implant suits the anatomy and surgical technique. Compatibility with plates, washers, guides, drivers, and other instruments must also be confirmed, along with applicable quality standards and documentation. Careful preoperative planning, imaging review, measurement verification, and risk assessment can reduce complications such as inadequate purchase, excessive penetration, or fixation failure. A balanced decision should support reliable fixation while matching the patient’s bone condition and the surgeon’s procedural objectives.